
The Ultimate Laser Cut Stencil Guide – Selecting Materials
THE ULTIMATE LASER CUT STENCIL GUIDE - WHAT MATERIALS SHOULD YOU CHOOSE?
join our subreddit https://www.reddit.com/r/lasereducation/
Creating a Stencil with a Laser Cutter
Step 1: Obtaining the Artwork
The first step is to choose the design, this can vary from making a business logo or creating some vector artwork for your stencil. Hopefully the business logo is a high quality image but most of the time I have to trace some distorted JPG they sent to make it work. The number one challenge of making laser cut stencils is creating artwork without any islands in the design. Another consideration you have to make is the materials you are choosing to laser cut the stencil out of. These factors and the original design will determine how much you have to edit the image to make a stencil.
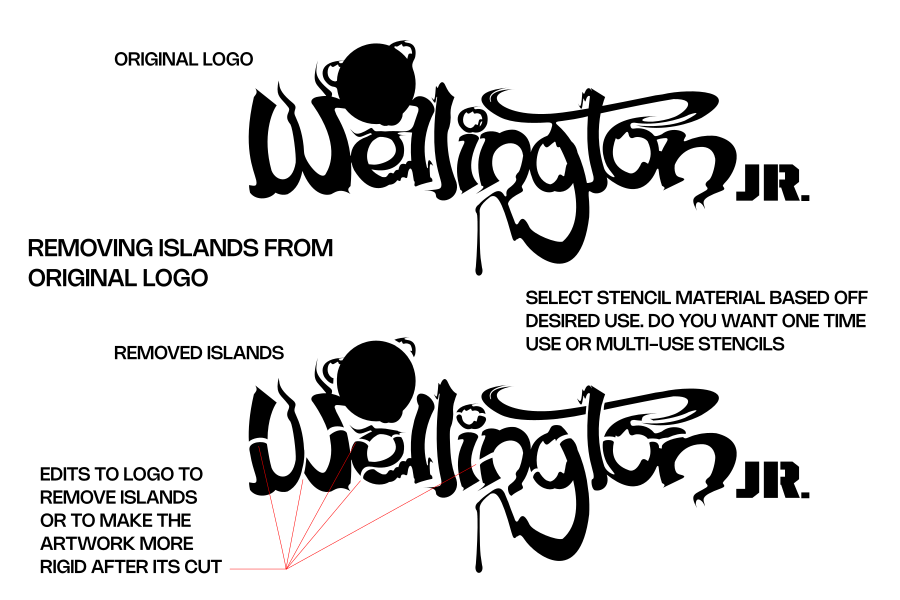
Diagram showing how to remove islands out of artwork for stencil design
Step 2: Converting to Vector Format
Once you have the artwork, the next step is to convert it into a vector format. Vector images are essential for laser cutting because they allow for precise and scalable designs and they can communicate well with the laser cutter software. You also have to remove all of the islands similar to the image above which shows our original logo and the edits I made to the logo so it would stay together in one piece. This will change the image slightly but it isn't that impactful to actually change the design. The following steps are a breif explanation on how to create your vector in Inkscape.
- Import the Image: Open Inkscape and import your image.
- Trace Bitmap: Select the image, go to
Path>Trace Bitmap. Adjust the settings as needed and clickOK. - Edit Path: Once the image is traced, you can edit the path to ensure all elements are correctly outlined.
- Remove Islands: Slightly edit artwork as required so stencil stays together and remains rigid.
- Save as SVG: Save the file as an SVG (Scalable Vector Graphics) format, which is suitable for laser cutting.
Step 3: Preparing the Stencil Design - Material Selection
Now that we have artwork that wont fall apart we will select our material. You have many options and they all have their uses. I have made stencils out of mylar, acrylic, card stock, card board, paper, PTEG, wood and others. It is important that you only cut materials suitable for laser cutting.
You could see a full list of materials you can and can not cut with a laser cutter and engraver here:
https://wellingtonjr.io/the-ultimate-guide-to-materials-you-can-and-cannot-cut-with-a-laser-cutter/
Step 4: Making a Test Cut
Before committing to a final cut, it’s wise to make a test cut. This allows you to check the accuracy of your design and make any necessary adjustments. Use a small piece of your chosen material and run a test cut to ensure everything is perfect with the design. sometimes i make a full size sample and spray it to make sure the design works for the application.
Step 5: Creating the Stencil
Once your design is finalized and tested, you can proceed to cut the full stencil. For larger stencils, consider breaking the design into smaller sections that can be pieced together. This is particularly useful for very large stencils, such as those up to 25 feet wide.
Materials for Stencil Making: Pros and Cons
Stencils can be made from a variety of materials, each with its own advantages and disadvantages. Here’s a breakdown of some common materials used in stencil making:
Conclusion
Laser cutting has transformed stencil making from a laborious hand-cutting process to a precise and efficient craft. By following the steps outlined above, you can create professional-quality stencils from a variety of materials. Whether you’re making small stencils or massive ones up to 25 feet wide, understanding the pros and cons of each material will help you choose the best option for your project. Happy cutting!


