
Reverse Aligning Your Laser Cutter and Engraver
REVERSE ALIGNING YOUR LASER CUTTER AND ENGRAVER
align my laser cutter using reverse alignment
Introduction
Aligning a laser cutter is a critical step to ensure precision and quality in your laser cutting projects. Reverse alignment, a method using a regular light laser, provides a straightforward way to achieve perfect alignment. In this comprehensive guide, we'll walk you through every step, from ensuring your machine is level to fine-tuning the mirrors for optimal performance. I have found this method of aligning my laser the quickest and easiest because with this method you are able to see the adjustments you are making in real time. This method also keeps your laser mirror free of debris it would otherwise accumulate due to the scorched tape method.
TOOLS YOU WILL NEED:
most of this stuff I already had in my workshop.
REVERSE ALIGNMENT TOOL: Select the laser alignment tool that fits your lens tube mount.
HEX KEY SET: make sure you get the correct type for your laser, metric, sae or trox. Check manufacturers recommendations.
LEVEL: Make sure your level is the correct size for your machine. I have a large format machine so I use a 4 foot and a 2 foot level.
SQUARE: You will have to get into tight spaces with your square to align your laser head.
FLASH LIGHT: I have a handheld flashlight and a headlamp which helps alot.
HEADLAMP: Its kinda dorky but it gets the job done.
BLUE PAINTERS TAPE: Painters tape is always helpful when using a laser.
METRIC WRENCH SET: I got metric because my laser uses metric, make sure you select the correct type for your laser.
Step 1: Prepare Your Laser Cutter
Ensure the Chassis is Square
Before diving into the alignment process, make sure the chassis of your laser cutter is square. This involves checking the frame for any distortions or misalignment. A square chassis is the foundation for accurate cuts and if you aren't square no amount of aligning will help you
Level the Laser Cutter and Bed
Your laser cutter and the laser cutter bed must be level to the ground. Use a spirit level to check and adjust the feet of the machine as needed. My machine has threaded stem casters which makes adjustment easy. A level machine ensures consistent performance and prevents issues during the alignment process. Be sure to lock your machine in place with caster locks or any method that works for you, just make sure that small bumps won't move the machine and cause you further headaches.
Level the Laser Tube
The laser tube should be level and positioned so that the beam exits at the same height as the first mirror. This alignment is crucial for the beam to travel correctly through the entire optical path. this adjustment is more difficult because the shapes of the components makes it difficult to find the exact center by eye. When doing a laser cutter alignment I usually start with this step and revisit it once I have completed the reverse alignment. This step also includes making sure that the center plane of mirrors one two and three are on an even plane, alignment will be difficult if all mirrors are at different relative heights.
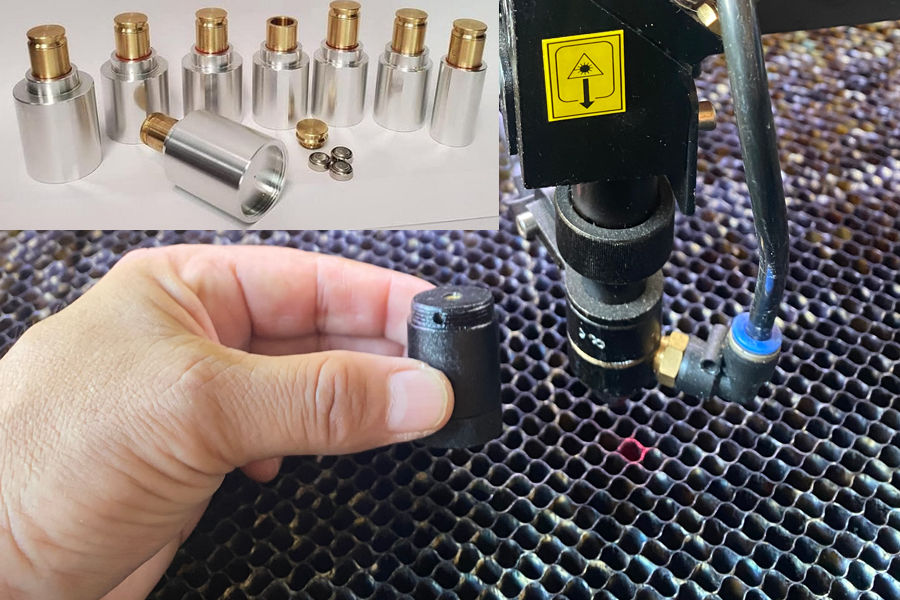
Laser cutter alignment tool used to align your laser engraver
Step 2: Installing the Reverse Alignment Tool
There are several types of reverse alignment tools on the market but they all work with the same principle. They project a red laser dot from the head of the laser in reverse all the way back to the laser tube where the beam exits. The most important part of selecting a laser alignment tool is to make sure you choose one that matches the diameter of your laser lens tube. Using the reverse alignment tool will eliminate stress and anxiety of aligning your machine and get you on your way to cutting and engraving your awesome laser projects.
Here is a great option for Laser Alignment Tools: https://amzn.to/3WbaVu3
Remove the Lens Tube and Insert the Reverse Alignment Tool
- Remove the lens tube from the laser head. Depending on your make and model you might have different fasteners but all of them are pretty simple to remove. My laser has a simple allen wrench fastener. Be sure to search your make and model of laser because there might be a manufacturer specific laser alignment tool.
- Insert the reverse alignment tool into the laser head. This tool will project a red dot, making it easier to align the mirrors. The alignment tool I use has a threaded connection so it just screws in. Now you have a dot that you could adjust in real time, sweet!
- Play with the Beam Now that you have the red dot make sure you move all of the adjustments on your laser mirror so you could see how each adjustment changes the locations and also how small adjustments make a real difference in the red dot location.
Align Mirror #3 to Mirror #2
You should now have a laser beam hitting the center of mirror #3. In my experience with laser alignments I have found the mirror #3 requires the least amount of adjustment because it usually sits pretty well at the zero position, hopefully you find this case with your laser cutter.
- Adjust Mirror #3 to align with mirror #2 on the gantry. How I start this is by moving the laser head to the farthest and lowest position from the laser tube beam and placing the red laser dot on the center of mirror #2.
- Check both near and far positions to ensure the red dot does not move. I incrementally move the laser head making sure the red dot remains in the center of mirror #2 as the laser head moves closer to gantry mirror #2. First I go from farthest point to about a quarter way towards gantry, I move between these two positions making adjustments to both positions until there is no movement. I repeat this process at halfway to the gantry, three-quarters of the way and the closest position incrementally. Before you move on you must make sure the beam stays on the center of the mirror #2 all the way though the full motion of the laser head.
- Lock the alignment, ensuring Mirror #3 and Mirror #2 are perfectly aligned. One you have made the first alignment in all laser head positions make sure you tighten all of your adjustments so the mirror remains in place. When tightening I usually like to make slow movements so I don't move the mirrors.
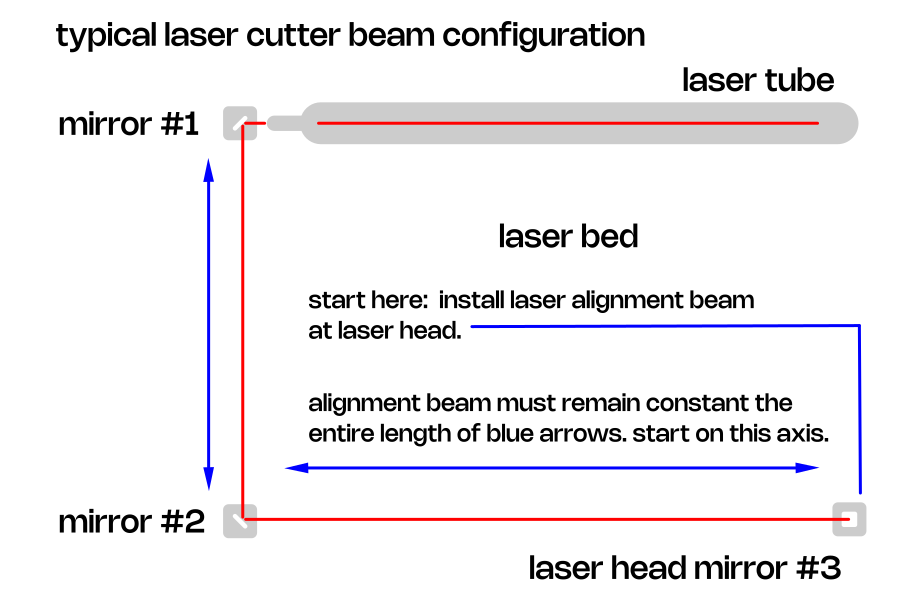
typical laser cutter and engraver beam configuration
Align Mirror #2 to Mirror #1
- Adjust Mirror #2 on the gantry to align with mirror #1 closest to the laser tube. Again I begin the process with the laser gantry set so mirror #2 is farthest away from mirror #1 and I center the red dot on mirror #1 from this position.
- Check both near and far positions to ensure the red dot does not move. Once again I follow the previous alignment steps to make sure the red dot remains on the center of mirror #1 from the farthest to the closet position of mirror #2
- Lock the alignment, ensuring Mirror #2 and Mirror #3 are perfectly aligned. Do not touch them again! Make slow adjustment when tightening.
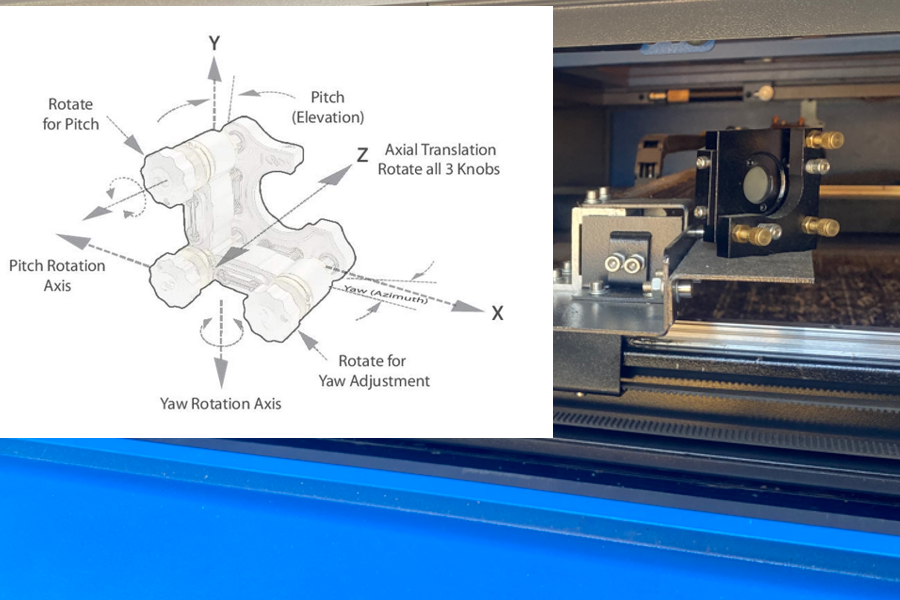
Laser Cutter Mirror adjustments diagram
Mark a Target Spot on Mirror #1
- Place tape on Mirror #1 and mark the spot where the red dot hits. Use a sharpie to mark the spot in the center of mirror #1. This will be your laser target. make sure you use low tack tape to reduce residue.
- Remove the alignment tool and replace the laser head as required.
Be sure not to send a laser pulse while you alignment tool is installed.
Step 3: Aligning the Laser Tube
Adjust the Laser Tube to Hit the Target Spot
- Adjust the laser tube so that the beam hits the target spot on Mirror #1. This is the point where I revisit where I started at the tube leveling, hopefully there should be minor adjustments at this point to get the laser beam to hit the target on mirror #1.
- Independently adjust the front and back supports to fine-tune the beam's position.
Reinstall the Reverse Alignment Tool
At this point I go all the way back to the beginning of the alignment process and confirm that all my adjustments remain centered and aligned throughout the whole motion on both axis.
- Reinstall the reverse alignment tool.
- Place tape over the laser entry hole on the laser head. This is the point where the beam exits the tube. You want the red dot to match the sharpie mark that you made on the tape. You should be able to accomplish this with minor adjustments
- Mark a target spot where the red dot hits the back side of the tape. and make any adjustments you may need.
- Repeat this process if necessary.
- Remove the alignment tool.
Your laser should be aligned at this point and ready to make some cuts. It might take a couple of times going through this process but you should be an expert at this in no time.
Troubleshooting: Gantry Level Issues
During the alignment process, you may find that the four corners of your gantry are not level. This can cause misalignment of the lenses and affect the overall performance of your machine. If you went through all of these steps but you feel it should have better results you might want to revisit the gantry levels. Each individual machine has different ways to adjust the levels but these are the basic steps.
Leveling the Gantry
- Bring Mirror #3 to the front of your machine, then move it to the back.
- If the alignment is not perfect, adjust the four corners of your machine to level the gantry.
- Recheck the alignment of all mirrors to ensure they remain properly aligned.
Conclusion
By following these detailed steps, you can achieve perfect alignment for your laser cutter using the reverse alignment method. This ensures precision in your cuts and the longevity of your machine. Follow us on social media or joint the conversation on our reddit forum https://www.reddit.com/r/lasereducation/


